Why your Quallamaggie breakouts fail in chop
A practical troubleshooter for Quallamaggie-style breakouts that keep failing in chop—spot chop-driven symptoms, fix level selection and timeframe anchors, align stops/targets to ATR volatility regimes, and reduce timing/execution friction with a repeatable breakout playbook and checklists.
Your breakout setup looks perfect—tight base, clean level, strong name—and then it pops, stalls, and snaps back into the range. If that’s been your week, it’s probably not “bad luck.” It’s chop: mean-reversion pressure, low-quality acceptance, and volatility that punishes standard breakout logic.
This troubleshooter shows you how to diagnose the failure mode fast, identify the specific mistake (level, regime, timing, or execution), and apply a tighter playbook that filters chop, upgrades triggers, and sets stops/targets that actually fit the tape.
Failure Snapshot
Chop doesn’t kill Quallamaggie breakouts by being “random.” It kills them by changing the payout curve, so your edge turns into fees and stop-outs.
If you can name the symptom, you can usually name the fix before the next entry.
Chop-driven symptoms
Chop makes breakouts look real for a moment, then punishes certainty. You care because each symptom points to a specific mismatch in regime.
- Breaks the level, then snaps back
- Reverses within one to three bars
- Prints wick-heavy candles at the trigger
- Shows low follow-through after entry
- Stops you out near entry price
- Hits you with spread and slippage
When three show up together, you’re trading a range wearing a breakout mask.
What success looks like
A valid breakout in chop is boring on purpose. You want a clean level, then acceptance above it, not a one-tick peek.
Follow-through should arrive quickly, with a pullback that stays orderly and tradable. Volatility stays predictable, so your stop means something.
If price can’t behave, your sizing and stops can’t behave either.
Quick triage questions
Answer these before you click, not after you’re annoyed. They force you to label the regime and the friction.
- Is the higher timeframe trending or rotating?
- Is the range wide enough to pay your stop?
- Is ATR rising, or just spiking?
- Is real volume present at the break?
- What session time is it right now?
- Is news imminent or unscheduled risk elevated?
- Is the level clean and obvious to others?
If you can’t answer fast, you’re guessing with leverage.
Most common causes
Most “failed breakouts” in chop are just range trades where you paid breakout prices. Others fail because the volatility regime changed after your signal triggered.
Bad levels matter too, especially ones cut through by prior wicks or built in low liquidity. Timing and execution friction finish the job, because chop magnifies spread, slippage, and stop placement errors.
Fix the regime call first, then fix the entry.
Chop vs Breakout Logic
Chop is a mean-reversion machine. It punishes breakout logic because your edge assumes imbalance and follow-through. In chop, price “peeks” beyond the boundary, then gets yanked back inside.
Mean-reversion pressure
Chop forms when liquidity sits on both sides of the range. Every push finds willing sellers above and willing buyers below, so wicks replace continuation. Your Quallamaggie-style trigger sees a level break, but the next auction snaps back to the midpoint.
The root cause is simple. No sustained imbalance, no trend.
Energy and volatility
Breakouts need fuel, not hope.
- Expand from prior compression
- Show rising ATR or range
- Print directional volume on breaks
- Stack closes beyond the level
- Reduce wick-to-body ratio
If two or more are missing, you’re trading a range with a breakout costume.
Acceptance, not touch
A breakout is real when the market accepts higher or lower prices.
- Wait for a clean close beyond the boundary.
- Look for a retest that holds without instant reclaim.
- Require time outside the range, not a one-bar poke.
- Confirm a micro-structure shift: higher lows or lower highs.
- Enter only after the range midpoint stops acting like gravity.
You’re paying for confirmation, and that’s cheaper than repeated false starts.
Where chop hides
Chop often looks “active” while going nowhere. You’ll see overlapping swings, equal highs and lows, and repeated fades from the extremes back to mid-range. VWAP and common MAs rotate flat, and price keeps crossing them like they’re not there.
When the midpoint becomes the best predictor, your breakout rules are upside-down.
Level Selection Errors
In chop, the level you pick often isn’t a boundary. It’s a liquidity beacon. That’s how you get the clean “breakout” candle, then the instant fade.
Crowded obvious levels
The more obvious the high, the more crowded the trade. Your “textbook” pivot becomes a stop shelf for shorts and a buy-stop pool for late longs.
In chop, that pool gets raided. Price prints the headline break, fills urgency buyers, then fades on thin follow-through.
If everyone sees your level, treat the first push through it as a test, not confirmation.
Wrong timeframe anchor
Chop punishes levels that matter only on your zoom setting. Anchor to where bigger money actually references.
- Using intraday highs as “the” pivot
- Ignoring daily and weekly closes
- Skipping gap highs and lows
- Overlooking prior breakdown points
- Anchoring to premarket noise
If your level doesn’t exist on the daily, your breakout is probably just a scalp.
Loose consolidation box
A sloppy box gives you sloppy signals. Draw the base like you’re defining a contract, not a vibe.
- Mark the true extremes of the range.
- Remove single-wick outliers unless repeated.
- Require at least two clean touches per side.
- Draw the midpoint and watch it act as a magnet.
A tight box forces price to “show its hand” before you risk real size.
Context alignment check
A level is only as good as the context behind it. In chop, a great-looking pivot can sit directly under major resistance, or inside a weak market tape.
Check three alignments before you call it a breakout boundary: the stock’s trend, the sector’s tone, and the market’s direction. Then scan for nearby daily/weekly supply that can cap the move within one ATR.
When your level fights the higher-timeframe map, you’re not breaking out. You’re volunteering as liquidity.
Volatility Regime Mismatch
Chop doesn’t just “feel messy.” It mechanically changes your daily range and ATR, so your breakout math stops fitting reality.
A 2R target that’s normal in expansion becomes fantasy in compression. Your stop becomes a magnet.
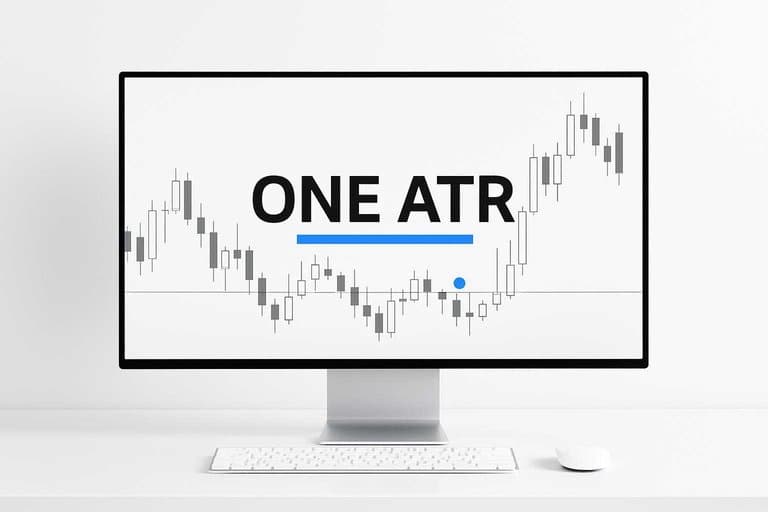
ATR tells the truth
ATR is your regime filter because it updates when price structure lies. Pair it with simple range-width context so you know if breakouts have room.
Use a quick classifier:
- Dead: ATR < 20th percentile, tight daily ranges
- Normal: ATR 20th–80th percentile, balanced ranges
- Expanding: ATR > 80th percentile, wider swings, follow-through possible
- News-driven: ATR spike plus gap/impulse, unstable spreads
If your ATR percentile and range width disagree, trust the one that limits movement: range.
Stop placement traps
Most breakout failures in chop aren’t “bad ideas.” They’re stops sized for a different regime.
- Placing stops inside the noise band
- Hiding stops at obvious wick extremes
- Keeping static stops during ATR expansion
- Forcing tight risk in a wide chop
Your stop should be hard to hit by randomness, not hard to stomach emotionally.
Sizing to volatility
You can’t fix chop by “being more selective.” You fix it by tying risk to volatility, then letting size float.
- Set your stop at 1.5–3.0× ATR from invalidation.
- Compute size: dollars at risk ÷ stop distance.
- Place first target at 1–2R or next liquidity zone.
- Move to scratch only after structure shifts, not after one candle.
If size feels “too small,” that’s the market telling you the trade is lower quality today.
Target realism in chop
Chop compresses follow-through because both sides keep finding liquidity nearby. Your breakout can be “right” and still stall after one push.
In chop, plan targets around what the tape can actually pay: prior day high/low, VWAP bands, or the nearest swing liquidity. Take partials fast when range is mean-reverting, and only hold runners when ATR is expanding and closes stay outside the prior range.
Your edge isn’t predicting the trend day. It’s recognizing when the day can’t be one.
Timing and Catalysts
Quallamaggie-style breakouts love clean air. Chop shows up when time-of-day or event risk pushes flows into rotation, hedging, and mean reversion. If you keep buying strength during those windows, you’re trading against the market’s job.
Session timing traps
Some parts of the day are built for fakeouts. The tape isn’t “wrong” then. It’s just dominated by two-sided liquidity and fast position adjustments.
The usual chop windows:
- Pre-market: thin books, headline jerks, wide spreads.
- First 30–60 minutes: opening rotation, VWAP battles, ETF rebalancing.
- Lunch: low participation, easy stop-runs, slow grind back to mean.
- Last 30–45 minutes: liquidity games, MOC imbalances, gamma pinning.
Trade your best setups when the market wants to trend, not when it wants to clear inventory.
News and scheduled risk
Catalysts can turn a clean breakout into a coin flip. Even “good” news can create chop as participants reprice, hedge, and fade each other.
Distorters to respect:
- Earnings and guidance days
- CPI, jobs, and FOMC events
- Sector headlines and regulatory news
- Analyst upgrades and downgrades
- Halts, SSR, and reopening auctions
- Options expiries and large strike magnets
If you can’t explain the catalyst, you’re probably trading the reaction, not the breakout.
Volume confirmation steps
Chop breakouts often have “one loud bar” and then silence. You want repeatable participation, not a single spike that fades.
- Compare current volume to the stock’s average at that time.
- Check volume-at-price near the level for real acceptance.
- Require sustained prints above the breakout price, not one pop.
- Watch if pullbacks hold on lighter volume than the push.
- Skip breakouts where volume peaks instantly, then evaporates.
One spike is often just stops and algos; sustained volume is sponsorship.
Market/sector filter
Your breakout can be perfect and still fail in a mean-reverting tape. When the index and the sector are chopping, leaders get sold into strength.
Do a quick top-down check:
- Is the index trending or ping-ponging around VWAP?
- Is your sector strong, or just bouncing inside a range?
- Is volatility expanding with direction, or expanding with whipsaws?
- Are multiple leaders breaking out, or only your name?
When the tape is reverting, treat breakouts as shorter trades or don’t trade them at all.
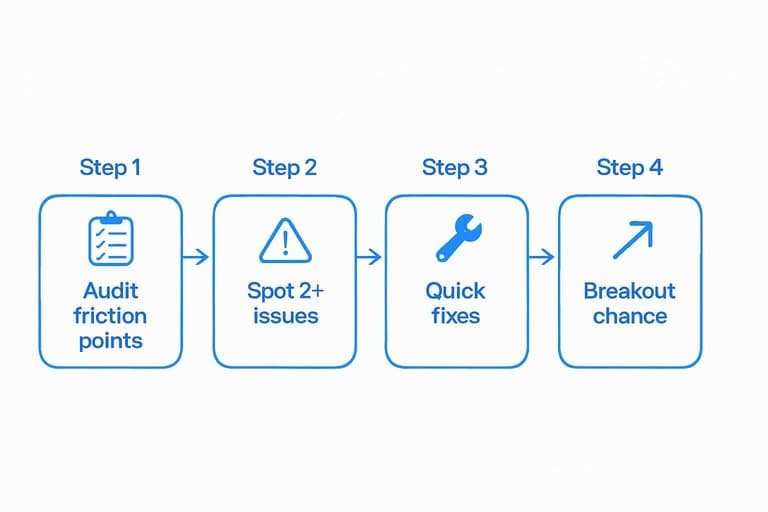
Execution Friction Audit
Chop turns small execution flaws into full-size losses. Audit the friction points that quietly kill your Quallamaggie-style breakout before it even has a chance.
| Friction point | What you see | Why it hurts in chop | Quick fix |
|---|---|---|---|
| Late entry slippage | Fill above trigger | You buy the spike | Use limit near pivot |
| Wide, panicked stop | Stop under “everything” | R gets too big | Stop under last base |
| No liquidity check | Spread suddenly widens | Exit becomes expensive | Skip thin premarket |
| Oversized position | PnL swings fast | You cut winners early | Size for planned stop |
| Missing invalidation | “It’ll come back” | Chop grinds you down | Hard stop, no debate |
If two or more show up, your edge is execution, not setup.
Fix: Breakout Playbook
Quallamaggie breakouts assume you’re buying strength that keeps going. Chop punishes that assumption with fakeouts, mean reversion, and endless “almost” moves.
Chop filter rules
You need a veto list that blocks trades before you start rationalizing. Make it binary. Yes or no.
- 3+ overlapping candles near the level
- Last N bars stuck in a tight range
- ATR below your minimum threshold
- Two failed breaks of the same level
- Flat VWAP through the session
- ADX below your trend floor
If you see three or more, you’re not in a breakout market.
Entry trigger upgrade
In chop, “first touch through the line” is a trap because liquidity sits just beyond the level. You want acceptance, not a probe.
Use one of these triggers instead:
- Close-and-hold: close above, then hold above for X minutes.
- Reclaim/retest: break fails, then reclaims, then retests from above.
- Expansion after compression: tight coil, then a wide-range bar with volume.
The upgrade is simple: pay a little later to avoid paying repeatedly.
Trade management steps
Manage it like chop is guilty until proven trending.
- Predefine your scale plan before entry.
- Move your stop only after price accepts above the level.
- Take partials into obvious liquidity pools.
- Trail under higher lows, not under every candle.
- Exit immediately on clean range re-entry.
Your edge isn’t prediction here. It’s refusing to donate when the market reverts.
When to stand down
Some sessions are engineered to chop you up, and discipline is the trade. If your best setup needs “perfect execution,” skip it.
Hard no-trade conditions include inside days, major news in the next hour, widening spreads, thin volume, and repeated stop-runs at the same level.
Standing down isn’t passive. It’s how you keep capital for the clean break.
Before/After Checklist
Use this checklist to force a pass when chop is hiding in plain sight.
| Phase | Check | Pass criteria | If not |
|---|---|---|---|
| Before | Regime filter | 20D ATR rising | Skip setup |
| Before | Trend alignment | Higher highs, higher lows | Size down |
| Before | Compression | Tight range, clean levels | Wait 1 day |
| In-trade | Breakout quality | Close above level | Exit fast |
| After | Review note | “Trend day or chop?” | Update filter |
When three boxes fail, you’re not early—you’re wrong.
Diagnose the Regime, Then Trade the Right Play
- Run the quick triage: Is price accepting above the level (holding closes), or just tagging it and fading? If it’s tagging and reverting, treat it as chop until proven otherwise.
- Rebuild the level with context: Anchor the breakout level to the correct timeframe, tighten the consolidation box, and avoid the most crowded “obvious” line if it’s been repeatedly touched.
- Match risk to ATR: Place the stop where the trade is invalidated given today’s range, size down to volatility, and set a target that’s realistic for a choppy regime.
- Only take A+ timing: Favor the session window and catalyst/volume confirmation that produces acceptance; if the market/sector is weak, stand down.
- Audit execution friction: Fix the operational leak (entry type, slippage, hesitation, partials, alerts) so you’re measuring the strategy—not your process.
Frequently Asked Questions
Is Quallamaggie the same thing as a momentum breakout strategy?
Mostly, yes—Quallamaggie-style setups are momentum breakouts that rely on strong relative strength and continuation. The difference is the emphasis on clean, obvious levels and stocks showing persistent demand rather than random intraday pops.
Do Quallamaggie breakouts still work in 2026, or has the edge been arbitraged away?
They usually still work, but the edge shows up during trending, risk-on tape and strong leaders, not during broad churn. Most traders lose the edge by forcing the setup in the wrong market regime or on weak relative strength names.
How do I screen for Quallamaggie stocks that are more likely to follow through?
Start with relative strength vs SPY/QQQ, high liquidity (e.g., 1M+ shares/day), and a tight consolidation near highs after an expansion move. Tools like TradingView, Finviz, or MarketSurge can filter for 20/50-day highs plus RS and volume criteria quickly.
How long should I hold a Quallamaggie breakout before deciding it failed?
Most clean breakouts should show progress quickly—often within 1 to 3 sessions—by staying above the breakout area and making higher highs. If it’s repeatedly back below the level with no momentum, it’s usually a failed breakout rather than “normal noise.”
Can I trade Quallamaggie breakouts on crypto or forex, or is it mainly for stocks?
You can apply the framework anywhere, but it tends to work best in liquid single-name equities where relative strength and earnings/news catalysts create sustained imbalance. In crypto/forex, you often need stricter liquidity/volatility filters and wider execution buffers to avoid false breaks.
Trade Breakouts With Regime Context
If your Quallamaggie breakouts keep failing in chop, the issue is rarely your pattern—it’s picking the wrong leaders at the wrong time.
Open Swing Trading helps you spot true breakout leaders with daily RS rankings, breadth, and sector/theme rotation so your playbook fits the volatility regime—get 7-day free access with no credit card.